Why Learning How to Draw the Jaw is so Important
If you haven’t sat down to study the jaw before, you know how frustrating it can be when you just can’t get it quite right. After this lesson, you’ll be able to understand the anatomy know-how to get it right every time!
In this article, you’ll learn:
- How to Draw the Jaw
- How to Draw an Open Mouth
- Basic Mechanics
- Opening the Jaw
The face and skull are… complicated, to say the least. So many components appearing all at once, needing to all be in sync – and getting them right is crucial. If anything is even a little off – you’ll know it.
Let’s take a look at how to draw the jaw.
The Hinge

Our first step in how to draw the jaw is to start off with a simplified drawing of the skull. To learn how to do this, check out our other post on Drawing the Skull.
Here we are focusing only on the mouth and the jawbone, so don’t really worry about the rest of the skull for this exercise.
Here we are looking at the head from the side. Indicated by the red arrow is the spot where the bottom jaw attaches to the rest of the head, or going geek mode – this is called the cranium.
This point where the jaw attaches is important, so take note of the relative placement and size. This is called the hinge, which is where the jaw will pivot. It sits about halfway between the back and the front of the head.
This is where all the action will take place.
The rest of the jaw and teeth take up about 1/4th of the total height of the head.

How to Draw the Jaw Open

To understand how to draw the jaw, we need to make a few notes.
- The upper part of the mouth never really moves. The upper lip can slide up and down a bit, but the teeth themselves are anchored to the skull
- As the jaw swings open, the mouth will also stretch and open
- The length of the jaw remains the same, from the hinge to chin as it opens and closes, it merely pivots
For this study of the mouth, you’ll be drawing someone that’s screaming to give you an extreme example of an open mouth.
In order to get the placement of the jaw as it swings open, you can imagine that there is a string that starts at the pivot point of the jaw and extends out to the most forward point of the teeth or chin.
Then to get the appropriate size of the jaw you can imagine that string swinging downward, without changing its length and still being attached to the pivot point of the jaw.
Notice that the area that is sticking up from the jaw is an indication as to where the teeth are located. This will be useful moving forward to eventually draw in the teeth.

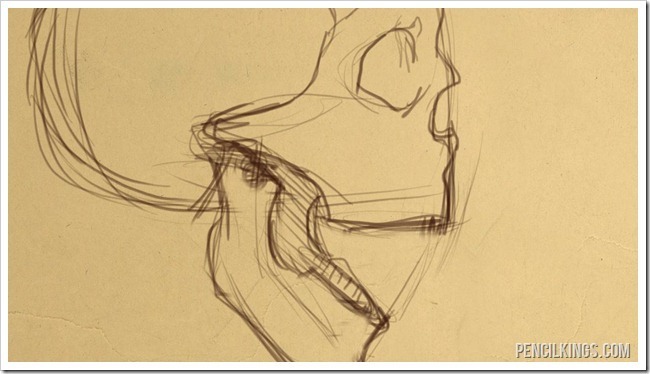
Drawing Through the Jaw
To deepen your understanding of how to draw an open mouth, you can fill in the back facing side of the jaw while remembering to incorporate the curve of the mouth.

The brow bone joins the nose to the face
Drawing the Skin Over the Jaw
Now that the open-mouth skull is finished you can start to draw the skin on top of it. Start off by drawing a simple nose and then drawing in the lips.
This is a really extreme pose, and the teeth will naturally be showing on both the top and bottom. If you make this pose yourself and try to cover your upper teeth with your lips, you’ll have a very unnatural feeling!
As the skin stretches into this extreme pose the creases along the side of the nose are going to become more pronounced. You’ll also want to draw in some creases along the outer edge of the lower jaw.

Here’s a look at the open mouth drawing with a little more detail added to the face.
That’s it! By now we have talked about the placement of the jaw, how to draw it closed and open, and how to lay in the skin to give our screaming mouth a face.
ASSIGNMENT
Find ten different reference images with varying range of motion in the jaw and sketch them out. Pay close attention to the position of the hinge, the upper and lower parts of the teeth, and the jaw.