Why Learn Proportions of the Face
Learning about the proportions of the head and face is crucial. The one thing we all see all day, are other people’s faces. When we see a face that isn’t quite right we notice it instantly. But knowing why or how the face is wrong, or how to fix it… that is hard.
In this article, you’ll learn:
- To pinpoint the location to place features
- Lines of the face
- Where to place features
Basic Proportions
We have discussed Andrew Loomis’s work in the past and we will be building on that knowledge, but if you don’t know what we’re talking about, now is the time to go head over to our head proportion post about rotating the head. Those of you still with us at this point, let’s get started.
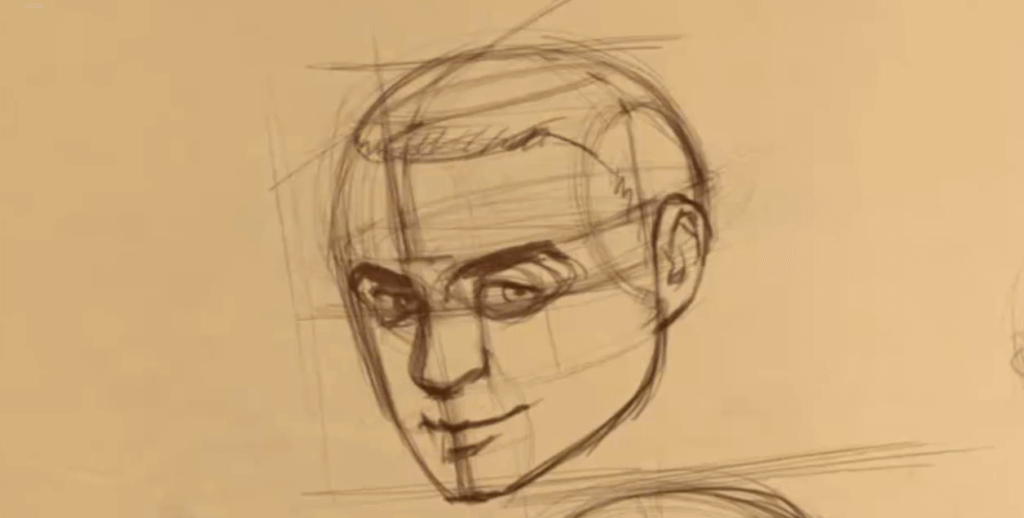
Understanding the Proportion Drawing Guides

To start off this lesson on face drawing proportions, let’s take a look at the different lines that you’ve created on the sphere and what each of them means.
● The Horizontal Line – This line is going to become the brow line.
● The Vertical Line – This is the middle line of your face that the nose travels down and divides the right and left sides of the face. This line is also useful for finding the middle point along the back of the head if you are drawing your characters from the rear.
● The Side-to-Side Line – This gives you the midpoint along the side of the head and helps place the ear.
● The Chopped Sides – These flat parts on the sides of the face is where the temple will go.
Face Drawing Proportions: Drawing the Hairline

The basic hairline is slightly different for males and females, with the female hairline being slightly higher. As you study face drawing proportions, you can see the female hairline is a little bit higher in the example drawing to the right.
The position of this line can also change depending on who you are drawing, but for the basic purposes of face proportions for drawing the hair line should be a little bit above the midline between the brow line and the top of the head.
Face Drawing Proportions: Drawing the Nose and Chin

If you take the distance between the brow line and the hairline we just created, we will be left with the height of the forehead. The height of the forehead is the measurement that you will use to also determine the height of the nose and chin.
Draw a line coming down from the brow line off of the sphere for the front of the face. First, take the height of the forehead, and then use that same distance and draw a guide line crossing the line that you drew for the front the face to create the nose.
Then, using that same forehead distance again, drop down one more time for the chin. When you break it down like this, face drawing proportions isn’t so difficult after all!
Face Drawing Proportions: The Jaw Line

The jaw starts just a little bit behind the middle point on the side of the head where the horizontal and side-to-side guidelines meet. This line first drops down at a steep angle and then changes direction to curve towards the lowest point of the chin.
When you are learning face drawing proportions and drawing in your guide lines, you should follow the example in the video and draw through to find the corresponding part of the face on the other side of the head.
You can see this being shown in the three-quarter view examples in the video when Sycra draws through to find the guide lines to create the jaw line on the opposite side of the face.
Face Drawing Proportions: The Back of the Skull

The last thing to do here is to modify the sphere a little bit to get a shape that’s closer to what a real skull looks like. In this side view image, you can see that the bottom of the sphere has been chopped off, approximately at the same height as the nose. This reflects human anatomy a little better.
Face Drawing Proportions: The Ears

The ears do not have their own line, they share with the nose and brow line on the front of the face. At the bottom, they sit on the nose line, and the very tip of the top of the ear aligns with the brow line. The brow line is one of the first lines we established.
If you are unfamiliar with the ear, you may want to take a look at some photos, but if you really want to get to know them – you may need some help. Talk to a friend or family member and see if they will let you take a look at these odd things sticking off the sides of their head.
They are flexible yet rigid enough to keep their shape. Each and every one of our ears is 100% unique, just like a thumb print. Although… they will not, in fact, give anyone or anything the gift of flight, despite the stories we are told.
Face Drawing Proportions: The Eyes

When placing the eyes, we need to establish somewhere to put them. Instead of first establishing an eye line like we have with the other features, we will be using the brow line.
Along the brow line we can indicate where the eye sockets are. They take up most of the space left to right on the skull, with a little space on the outer sides. They end about halfway down to the nose line.
With that, just draw in the shape of the eyeball, and you’ll be all set up to draw in your character’s eyes. If you aren’t familiar with that you can read our posts on How to Draw the Eyeball, and How to Draw the Eye.
Face Drawing Proportions: The Nose

Most of the guides we need to add the nose to the face have been added. You can see here that the view of the front of the nose is very different compared to the side view. You can learn more about drawing noses in our post How to Draw Noses. The nose from the front view is one eye width wide, and this will be drawn on our previously established nose line.
From the side, the nose is much more of a triangle, but of course, it is still the same length. The only addition has been the brow bone which is primarily only recognized in the profile. It protrudes just a bit but the exact size of it changes and is more likely to be seen in men than women.
Face Drawing Proportions: The Mouth

To get the placement of the mouth you can go with the guideline that you previously drew that is half of the distance between the nose and the chin.
One alternate method of placing the mouth is to divide that lower section into thirds and place the mouth on the upper third closest to the nose.
To get the width of the mouth you can take the center point of the eye and drop a line down.
When you are drawing your mouth remember to add a slight curve to it to help show the roundness of the face and don’t forget to add a little shading in on the corners of the mouth.
When drawing the female mouth, you can place the mouth slightly lower in order to make room for the larger lips to be drawn on the mouth.
While learning about face drawing proportions, you can follow along with the video to see examples of drawing in the mouth in proportion on the three-quarter view head.
Face Drawing Proportions: The Eyebrows

We have already established most of the face at this point. Our last step now actually brings us around to the start by drawing in the eyebrows. We added in the brow line basically at the beginning of this post – it feels appropriate for it to be the thing we end off with.
Using our brow line and the eye sockets, we follow the shape around the eye to draw in the brows. For more information on drawing eyebrows visit our post on How to Draw the Eyebrows.
Now you can venture forth and draw faces to your content with this post, and our other How to Draw!
TIP: In any step in our post, you can study your own face, family, or a friends’ to examine the proportions. Or you can go out like a true artist where you people watch to the point that it becomes uncomfortable for both you and the person you are watching.
*Pencil Kings does not condone stalking.
ASSIGNMENT
To practice the proportions and drawing in the features, take the time to quickly create 50 heads in succession. Work through starting at the sphere and ending with the eyebrows, spending little time on each one. This is not about the end result, but the practice of breaking down the face and drawing the features in the correct proportions.