Why Learn How to Draw Ears
Drawing ears can be a little tricky, if you are like me – you’ve never put much thought into ears – until you started to draw faces! You may not understand the ears, but you will definitely know if they are off – so this post will help you get those pesky ears just right.
In this article, you’ll learn:
- To draw the ear from the side
- To draw the ear from the front
- To draw the ear from the back

Learning to see the nose as a 3D object will help you draw it more easily
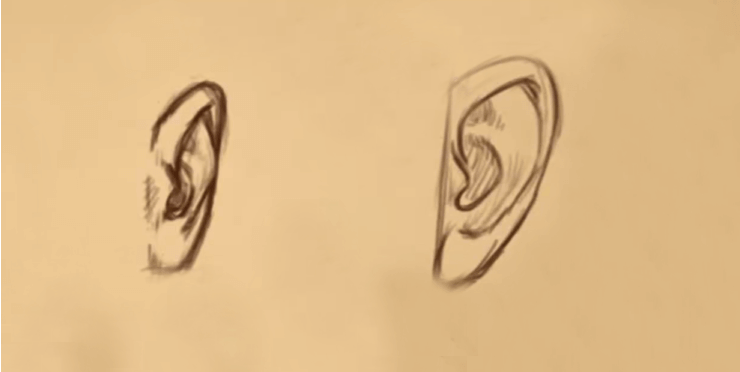
How to Draw an Ear: Side View
In this lesson about how to draw an ear we’ll first focus on the basic shapes you will need to understand and master throughout this post.
Step One: Start your Ear Drawing with a Curve

Draw a vertical line to show where the top and bottom of the ear attaches to the rest of the face. The curve of the ear goes up first and is much wider on the top than on the lower portion.
Step Two: Drawing the Inner Ear

There are a lot of little shapes inside of the ear. The one we see here is the ear flap that covers the hole in our ear, the continued shape as the flap transitions up and around folding in on itself.
The curved line above also wraps around, but this time it is much larger. Notice the way the top curved line interacts with the lower and inner line. It comes from the inside of the ear, passes by the flap as it draws upward. This is a feature that is mostly overlooked. Use this in your own work and you’ll be impressing viewers everywhere (even if they aren’t sure why it looks so good)!
As this line continues downward it will become lighter. This is because it becomes less defined as it wraps around the inner ear lobe.
Detailing the Inside of the Ear Drawing

When learning how to draw an ear from the side, note that there is a rounded Y-Shape on the top inside part of the ear.
You don’t need to use lines to define this area because there are no sharp transitions or overlapping pieces of skin. Just use light shading to define it instead.
Using the same technique, you want to shade in both the top outer area along the inside of the ear and the pit of the ear that surrounds the ear hole.
After you have added these areas with the shading you are finished defining the major forms of the ear.
Finishing the Ear Shading

The last thing to finish off this drawing of an ear is to add some additional shading and contour lines to help give some more depth and volume to the drawing.
It may be a good idea here to look at some reference photos if you are not familiar with how these different parts overlap and cast shadows on each other.
With this basic understanding of this simplified ear, you should practice drawing it several times to make sure that you have really grasped what needs to be drawn to complete an ear like this.
TIP: Remember that it’s not enough to just ‘know’ how to do this. You also need to apply this knowledge to your work so that you can gain and eventually master the skill.
ASSIGNMENT
Once you have some references collected, it is time to put your pen to paper (or stylus to tablet) and practice drawing ears. This time you will draw twenty different ears from the side view. Make a special note of the differences between each reference because no two ears are the same. They are as unique as your fingerprints!
How to Draw an Ear: Front View

When you learned how to draw an ear just now, it was purely from a side view, and that is the easiest way to both draw and understand the ear. But the problem with this is that it is just a flat representation, and it’s easy to forget that the ear has thickness, or mass.
TIP: When learning to draw ears or any other subject, it is imperative that you understand not only what makes up the subject – such as anatomy – you must understand the 3D form of the object as well to capture it correctly.

In learning, how to draw ears from the front view, first you should understand the ear from the side view with some thickness to it, as if it fills up a box like in this image. If you turn the box in the previous step ninety degrees to the side you will now have a front facing ear, and the box that it is contained within is not very thick.

Your drawing of the ear is going to need to fit within this narrow box to have a convincing effect when you draw the ear from the front view.
Begin Drawing the Details of the Ear

Drawing the ear from the front is actually not much different from drawing it from the side. Instead, it is compressed into a smaller space. You can also basically follow the same steps as before, by drawing in the curve of the outside of the ear. Move onto the curve inside of the ear starting with the flap then as it travels down and around, and then again, the upper curve that goes up and around the ear.
Adding The Y-Shape of the Ear
When you begin to draw this detail of the ear you need to remember that it pokes out a little bit past the outside of the ear on most people’s ears before it curves down to the lower part of the ear.
This may seem a little complicated and confusing at first, but don’t overthink this too much. Use your references to pinpoint the exact shape.
ASSIGNMENT
Once you collect your references of front facing ears, study the 3D shape, and the slight differences between front and side facing ears. Do at least twenty studies before moving on.
How to Draw an Ear: The Rear View

It’s pretty rare to see a person’s ear from the back – so you won’t often need to draw the ear from these angles, but it’s important to understand them.
Knowing how to draw the ear from the back will help strengthen your understanding of it as a three-dimensional shape by exploring it from all angles.
Start with the back-view silhouette including the ears. This image may look a little strange at first, but don’t get thrown by it.
If you focus just on the outline, you’ll realize that it’s exactly the same silhouette as you would have if you were drawing the face and neck from the front view.
This particular drawing has also included the muscles that stretch up from the back and attach to the lower base of the skull.
How to Draw an Ear from the Back

You can think of the ear as sort of a plate or dish; it protrudes outward and upward. This design, for all intents and purposes, is like a baseball mitt, it wraps around and directs sound waves – just as a ball into a mitt – into the ear and we are then able to hear it. (Just like the ball it creates a sound as soon as it is cradled.)
Because the silhouette is the same from the back view, the main difference is what you will be drawing inside that silhouette. Namely, two pieces can be found. The deep dish of the inner ear, and the lobe of the outer ear.
While you are thinking about the ear, make sure to take your fingers and feel the shape of your own ear to help with your understanding of the forms before you dive into drawing. You can even study your ear, family, or friends ear to understand this further.
The first thing to draw here is the line that defines the outer rim of the ear. You can think of this outer rim as kind of rolling up and over the skin that attaches the ear to the head.
Second, add in the deep dish of the inner ear. It is in a short cylindrical shape that is wider towards the outside and slimmer at the base where the ear attaches to the head.
As you can see, the ear from the back is actually a very simple structure.
ASSIGNMENT
It is still pretty easy to draw this – which is great, but yes… We are still going to study them. Find references and draw twenty ears from behind.
How to Draw an Ear from the Back Three Quarter View

If you can remember how you learned to draw the ear from the side view, you’re now going to be turning the ear slightly to combine the side view with the back view to give you the three-quarter view.
I think it’s worth saying again that even though it’s unlikely that you will need to draw the ear from this view very often, it’s still an important exercise to help you better understand the ear, that will actually improve your ability to draw an ear from any angle.
To simplify the major shape of drawing the ear from this view you can think of it like a question mark.
The hook part of the question mark forms the top of the ear, and as it curves down towards the bottom the ear lobe creates the dot on the bottom of the question mark.

Start by first drawing the outer rim of the ear. If you are following the video, you can see that the instructor is starting to draw the outer rim at the very bottom of the ear.
Then, he continues to draw that line stretching upward and around towards the front of the ear, before ending as it turns inward towards the middle of the ear.
Leave a little bit of separation between the rim of the ear and the ear flap in the middle-front. When learning how to draw an ear from the back, remember the flap is the little piece that sticks out and partially covers the hole of the ear where sound can enter.

Finish off your drawing of the ear from the back three-quarter view by adding a bit of shading into the inner part of the ear that is under the outer rim. The other part to add is the curved piece of skin that attaches the ear to the head as seen from the back view.
ASSIGNMENT
Collect your last batch of images of ears, this time they can be anything but if you can find more of the back third – use them! Finish off with twenty more drawings and you’ll be a pro.