Why Learning How to Draw the Lips is so Important
If you feel your portraits are falling flat – it is probably because you haven’t figured out the structure of the face. Here we will be exploring how to bring your mouth action to life, with this How to Draw the Lips post.
In this article, you’ll learn:
- The Shape of the Mouth
- How to Draw the Mouth
- Drawing Lips from Front and Side View
The Curve of the Mouth
Are you ready to learn how to draw the mouth? Then, let’s get started!
One of the rookie mistakes that people often make is to think of the mouth as a flat object. In reality, the mouth sits on the curved surface of the teeth.
The result of drawing a flat mouth is that it’s going to stretch oddly across your subject’s face, confusing the viewer.

To learn how to draw the mouth, we must first establish the curve of the teeth. This is easily done. All you need is a short cylindrical like shape, much like the same size and shape as a tuna-can. Tuna-can to the rescue!
TIP: Doing a daily exercise where you practice drawing simple shapes such as ovals or cylinders, cubes, and cones will improve your drawing skills and motor functions. Both of which are essential for us artists and helps keep our hands healthy, along with stretches of the hands, figures, and wrists.

If you are paying attention, you’ll notice in this example of the lower half of the skull, the tuna-can slips into the cavity of the jaw quite easily.
This is going to be the base shape we need, and it is easy to duplicate in different views. To get a better sense of it, grab a mirror and look at how your own teeth turn and curve around your face. You may feel silly, but doing this in front of the mirror will help solidify the idea in your mind.
Thinking of the mouth as a curved plane will really go a long way in learning how to draw the mouth naturally and correctly.
TIP: Studying the skull will give you the ammunition you need to correctly draw the mouth, teeth, and jaw. To practice, draw the skull from at least 10 different angles using references to render the shape and anatomy.

The curve of the mouth really comes into play when you are drawing the mouth from different angles.
While the front view may not be the best way to see the curve, when you start to draw the mouth from the side or three quarter view you’re going to really see the curve become visible.
Drawing the mouth from an upper or lower angle is another situation where the curve is going to become a lot more apparent.
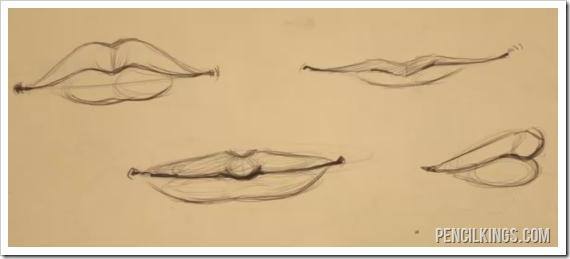
In this example above, you can see that we are learning how to draw the mouth from several different angles. Going from left to right, these angles are:
- Upper View
- Front View
- Lower View
- Side View
How to Draw the Lips
Now that we understand how to draw the mouth shape, we can move onto how to draw the lips.

Our first step is to lay down a few ellipses (or ovals), which will indicate the direction the mouth is facing. In this example we are looking at the mouth from the front, the indication of the ellipse is a little hard to see in this photo.

Next, we draw in the middle line between the two lips. Remember to add a slight curve to this line, because the mouth is sitting on the rounded structure of the skull and the teeth sit below it.

When drawing the lips we can think of the lips as five plump ovals or rounded planes. These ovals indicate the anatomy of the lips known as lobes.
Begin by adding in two large ovals or lobes to form the lower lip and three above as indicated in the example. The center of the upper lip is a rounded heart shape.
This will give you a good base to begin drawing the lips.

With these ovals as guides, we finish drawing by adding the outside edge of the lips.
When you are drawing in the lower lip, you can sometimes indicate a slight indentation right at the middle, just like in this example. This indent should form naturally between the two guide ovals that you drew to create the lower lip.
How to Draw Lips from the Side View

In the side view, things will look a little different.
We will only be able to see one and a half lobes on the top, and a single one on the bottom. You can see that the top center lobe pushes forward compared to the bottom lip.
Fill in the center line, which has two upward sweeping curves.

Lastly, in our How to Draw Lips post, we will fill in the upper and lower line of the lip.
The width and height can be played with to either have very large lips or thin lips. Some people even appear to have next to no lip.
TIP: Using a reference, will let you know exactly what the upper and lower lip will look like. References will also allow you to explore hundreds of other possible lip shapes.
And that’s it – you’re done! You now know how to draw the mouth from every angle.
ASSIGNMENT
To practice this technique, draw out a number of ellipses. Using the curved line draw a set of lips over top. Practice doing this at least 10 times in each angle (40 in all), from the upper view, front view, lower view, and side view. Make sure to use different references each time so you can explore all the different shapes and sizes lips can come in.