Why Learning How to Draw Teeth is so Important
Have you ever drawn a mouth that comes out looking really flat… and you’re not sure what you need to do to give it a more natural feeling? That’s because you haven’t learned everything you need to about the teeth and mouth to draw them convincingly.
In this article, you’ll learn:
- How to Draw Teeth on a Curve
- Teeth Exposure Under Different Mouth Movements
- Natural Looking Teeth
This lesson will build on other lessons like how to draw the Mouth, Lips, and Skull.
Establish the Shape and Plane of the Inside of the Mouth

One of the biggest blunders artists commonly stumble upon is the assumption that the front of the face is flat. But if you want to know how to draw teeth, you need to take a closer look at the skull and you will find that the mouth, teeth, and jaw exist on a circular plane, a cylinder. Like a can of tuna – yummy.
(If you don’t believe me, go take a big bite out of a piece of bread to convince yourself… It’s okay I’ll wait!)
Geek Mode: the grouping of the mouth, teeth, and jaw can be referred to as the oral cavity.
First, draw in three ellipse (or ovals), a top, middle, and bottom, connect them along the side to create the desired ‘tuna-can’ shape. We will be laying the teeth over this little construct.
TIP: Doing a daily exercise where you practice drawing simple shapes such as ovals or cylinders, cubes, and cones will improve your drawing skills and motor functions. Both of which are essential for us artists and helps keep our hands healthy, along with stretches of the hands, figures, and wrists.
Adding Teeth to the Mouth

These big bold chompers of ours have about 32 teeth altogether unless you get any removed.
Now, looking at how to draw teeth, the mouth is round and the view will determine the anumber of teeth visible. From this front angle, you will be able to see about 10 teeth on the upper and lower jaw. Notice how the jaw wraps back around the initial ‘tuna-can’ we have already established.
This causes the rest of the teeth to be hidden away from view because they are blocked by other teeth.
TIP: You can practice by drawing the teeth from different points of view. Studies of the skull can be used, or you can gross yourself out by using images of dentures.

Here you can see the final result having filled in the bottom teeth as well with an indication as to where the chin is located. The area directly around the teeth are the gums.
NOTE: For the steps 3 – 6 on how to draw teeth we will be reverting back to step two before moving on. We will be using the basic shape of the cylindrical teeth and draw lips over them.
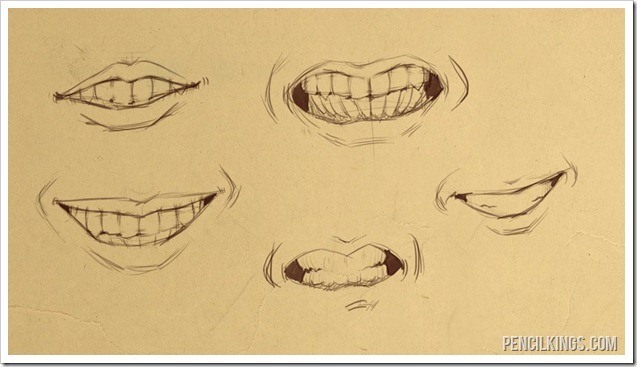
A Closed Mouth

One of the most basic, and commonly used mouth shapes is merely a closed one. We will be exploring a few different examples that will show the range of lip shapes, and how to draw the teeth. When drawing a closed mouth, where the lips meet will be around the same spot as where the teeth meet. So placing the lips is easy; we simply sketch them directly over where the teeth meet.

To clean things up, we have erased the teeth that can’t be seen and because we are exploring a closed mouth, there are no teeth to see.
TIP: The shape of the lips will also exist in the same circular shape as the teeth. To learn how to draw lips you can read our post about drawing lips.

Our last effort is to finish off the mouth by adding the top and lower lip lines. The top lip is usually shaped somewhat like an “M”, while the bottom is just an upward curve. Some people have thick, plump lips, while others can be so slim you can hardly see them. To learn more about drawing male and female lips you can read our post about The Difference Between Male and Female Lips.
An Open Mouth

Here we will be exploring the casually opened mouth. The opening of the mouth usually reveals mostly the top teeth. The shape is important because it is easy to create a smiling mouth if you aren’t too careful. Everything is under exaggerated because it needs to seem relaxed.

To keep things tidy, again we have erased away what can not be seen. What is left are about seven upper teeth, and you can’t even really count the lower teeth. We have filled in the upper and lower lip. There is also an indication of a bit of darkness around the edges of the mouth and Geek Mode here: the edges of the mouth are called ‘oral commissures’.
A Smiling Mouth

Pushing past the casual open mouth is now the task, we need to pull the lips back and up around the teeth. This is going to expose more teeth, both up on the upper and lower jaw.
Smiles really differ from person to person – how much teeth v.s. gums that they show will vary.
TIP: Playing with different variations will bring more range and believability to your art.

Similarly to our previous steps on how to draw teeth, we have erased the teeth that can not be seen in the example – removing all signs of gums and only revealing a small amount of bottom teeth.
The upper and lower lips have been applied and can be seen stretching out across the teeth and pulling back towards the back teeth. The smile wraps around the cylindrical form accentuating the turn, stretch, and tuna-can shape.
You will also notice that as you smile broadly you will find creases form on both sides of the mouth.
Angry Mouth

This mouth is usually called an angry mouth like someone is bearing their teeth, but they can be grimacing as well. Someone can also be flinching or waiting for something to happen that is scary or painful and may be accompanied with “breathing through the teeth.”
Try it! Why would you react this way?

Erase the unseen teeth, and add in the shadows seen at the side of the mouth.
Then draw in the lips, which should be quite thin due to all of the stretching they are doing to make this extreme pose.
Lastly, add in some creases on the sides of the mouth where the lips are pulling back into the cheeks and causing the skin to bunch up.
Simplifying the Teeth

Now that we understand the form and function of how to draw teeth we can simplify the process.
Teeth are actually quite a light value compared to any other value you may be using around them, in the mouth or the lips framing them. Because of this, you only need to indicate where the teeth are by focusing not on the teeth, but the shadows cast by them.
This is usually seen in the corners of the mouth like we already know, and the shadow cast by the upper teeth, onto the lower. Due to this, the teeth are hardly ever accentuated and can be left practically unrendered, depending on what you want to accomplish.
ASSIGNMENT:
To practice drawing teeth and different mouth shapes, find references of a range of emotions and practice drawing them. Pay attention to how much teeth you can see depending on the emotion being portrayed.
Now that we know how to draw teeth, using the tuna-can-shaped base, we can easily draw them in. We can also use our new found knowledge to change the mouth expression while keeping the right teeth and gum ratio.
To put this into practice, study the skull from various angles giving the teeth special consideration. Using these studies and photo references of mouths, you can single out the mouth and practice laying the lips in.
Look at both male and female examples, finding their individual features to look at how these expressions change from person to person. Do they show the same ratios or are they different? Noting these differences will give you a range of options in your own work.