Why Learn How to Draw the Face
Human anatomy is one hell of an upward battle. So many things to learn, to draw, to retain. But taking it step by step you’ll be a pro in no time. This is one of our final steps in learning about drawing the head, now, we are just putting it all together.
If you haven’t seen How to Draw the Proportions of the Face, How to Draw the Head, or How to Draw the Eyes, Nose, Mouth, Ears – you better get on those first before returning here.
Once you are ready to proceed, we can get started.
How to Draw the Face: Establishing the Guidelines

Like anything else in life, a strong foundation will create a greater structure. So, first, we need to lay down the brickwork to create a strong portrait drawing. For the broad strokes, we need to sketch out the shape and position of the head.
TIP: Using straight lines to ‘block-in’ measurements is a great reference point to start off with. You establish the most obvious straight lines that you can best observe. Then create sub-divisions between remarkable changes, such as light or shadows, and turns in major planes. Once you have the features of the example planned you are done, or you can start adding in details to develop it even further.
First, we have the shape of the head, including the position of the neck and jawline. This will imply the direction of the face and will be the size and shape we base the rest of our drawings off of. With a few more simple strokes we’ll have everything we need.

We are going to be adding in some construction lines, so If you haven’t learned about the basic proportions of the face you’ll have to check out our post. Notice above that we have the following guidelines
- Outline of the face and jaw
- Brow line
- Eye line
- Position of the nose
- Indication of the mouth line
- Ear height
If you are feeling stumped with any of these, I’ll mention again for you to go back and visit our post on Drawing Facial Proportions.
TIP: Developing the skills to structure a drawing base, is more important than actually being able to create a finished piece. It is the foundation that each and every piece of work you do will be built on and will make everything you do much stronger.
How to Draw the Face: The Eyes and Nose

Hopefully here, you will notice how our construction in the previous steps will guide us as we move forward. Along the eye line, we can place the eye shapes. It isn’t as easy to place features on the face when we are looking at it in the ¾. The front and profile seem to be easier. You can’t measure, you have to almost guess. If you haven’t studied up on eyes yet, you can learn more about them in our How to Draw Eyes post.
Here is where the reference and the base constructions really come into play. If you have constructed enough faces, the exact proportions will start to be easier, but in the meantime, practice makes perfect. Once you do 100 or more constructions of the face you’ll get the gut feeling of what is right, or if it isn’t, how to fix it.
Using the bottom point of the nose line, we fill in the shape of the nose. In the ¾ view, it holds pretty true to the profile view. The distances, relative spaces, heights and widths all change. But once you understand the separate pieces that you are trying to capture like the eye and nose you’ll be able to draw the features in every view.
How to Draw the Face: The Face, Brows, Mouth, and Ear

Once the basics are in, as well as the guidelines, the eyes and nose, we can move onto the remaining features of the face.
First, we establish the outline of the face, paying attention to the chin, cheekbone, eye, and brow. If you look closely, it is obvious that the top of the eye extends far beyond the line leading to it. This is because of the way the eye is shaped, the lids sitting upon the eyeball. It is its own shape and here you can clearly see it.
The brow is also a point to keep a close eye on. The brow bone tends to stick out a little compared to the rest of the forehead. It’s also important to know that the brow sits on top of the skin so it needs to be defined as well. The basic shape is all that is needed, individual hairs would be hard to see from here.
Our last element that has been established here is the shape of the ear. We already had the placement from a previous step but here we are defining its outer shape in the same way all the other features have been up until this point.
Shading the Face

The last step in drawing the face is to lay in the shadows that will only cement the structures you have established thus far. If you haven’t explored drawing the features you may have a hard time creating believable shadows. You can look at our other posts on drawing the features such as the eye, nose, mouth, and ears. You can also see or post on Shading the Face for more information.
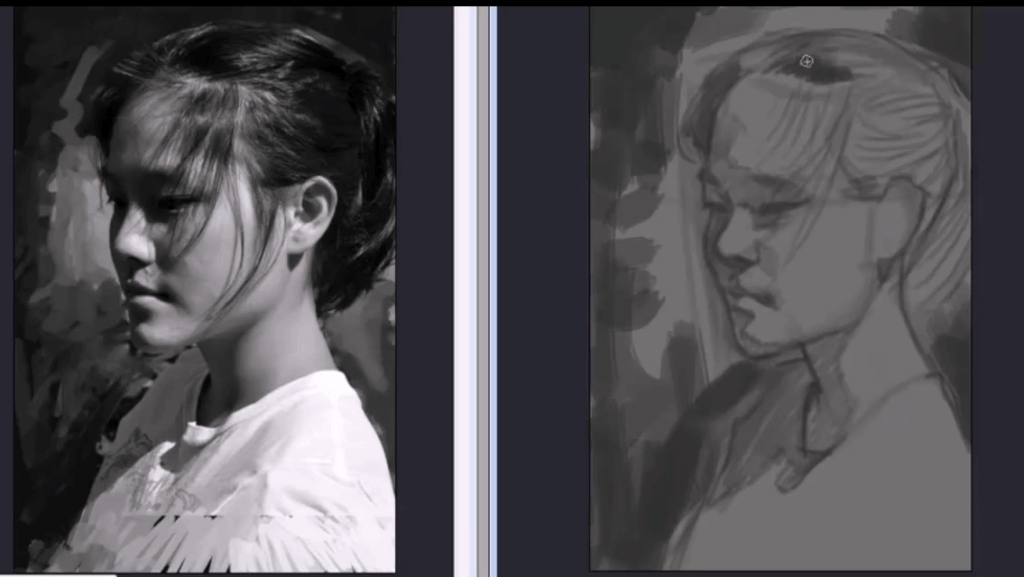
The shadows are copied quite easily from the reference on the left, however, the shapes are hard to see. Being able to make use of this information provided, you must have an understanding of the features that are obscured to still provide an accurate depiction of the forms.
The light source is coming from the upper right, and slightly in front of the subject. All the shadows will be on the left-hand side, slightly behind her. Here you can clearly see the features that are in direct light, which of course are all on the forward right side. As the features of the face turn towards the left or blocked from view by the nose, details are shadowed.
Knowing the source and direction of the light can sometimes be all the information you need once you understand the forms of the face as you can picture the 3D forms and how they can interact with the light source. It’s important to know that light travels in straight lines, so you can use simple perspective to establish these boundaries.
TIP: In the video course, all of these steps were accomplished in less than seven minutes so doing quick studies is possible. Place the reference next to your drawing space, using the exact proportions in the image as in your drawing. Establish the boundaries in simple shapes as shown in step one. Slowly break down the steps by adding guides and progressively adding more detail until all of the elements have been drawn. Quickly move onto the next study to get as many done as accurately as possible.
ASSIGNMENT
Using the information and tip above, you are to create 15 portrait studies. Try to accomplish this as quickly as possible, while still assuring accuracy in the reproductions. Lay your reference to the side (left for right handed people, and right for left handed people) of your drawing area, break down the shapes of the face in the same way described in this post, adding features and practice then laying in shadows. Limiting yourself may help you accomplish this task, by restricting yourself to only ten or twenty minutes.