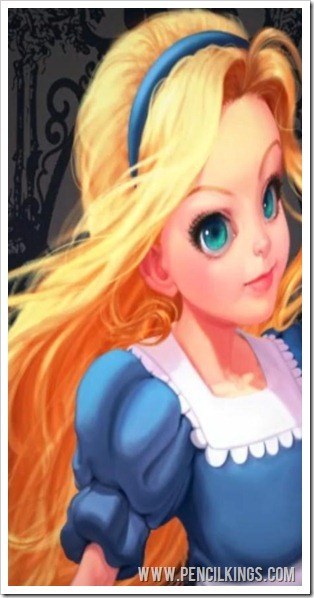
Here’s a look at the final painting in this lesson on painting Alice in Wonderland
In the previous lesson on painting Alice in Wonderland, Sycra showed you how to make final adjustments to your painting before setting your brushes and bringing up the Color Window to work with.
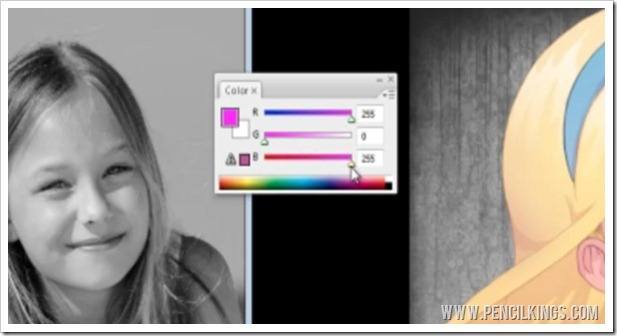
Now, you’re going to learn more about the RGB slider and how you can use this to mix any color under the sun! Color theory can seem a little tricky at first, but with practice, you’ll soon be blending hues and creating colors like a professional!
Knowing Your HSB From Your RGB
As we mentioned before, mixing colors using the RGB slider is known as ‘additive color’, where you can add or subtract red, green or blue to a color to create a different one.
Whenever you have the sliders close together, you end up with a de-saturated color such as black or white at each end of the scale. When the sliders are far apart, you end up with…you guessed it, a saturated color.
For example, if you wanted a dark red, you would have your G and B sliders to the left and then move the R slider to the right – notice how more red is now added to the almost black color?
The reason why Sycra prefers to use the RGB sliders rather than the HSB sliders is that it gives you much greater control over the colors you’re mixing.
For example, when you’re learning about painting Alice in Wonderland, you can just use the Color Picker Tool to select a color in your painting, then take note of where each slider is in relation to the other.
By adjusting the RGB sliders and keeping them roughly in the same position to each other, you can get a whole range of variations on the original color which look natural and subtle. And, as Sycra is fond of saying, subtlety is where he’s at!

Primed for Painting
Having learned all about how to use the RGB slider, you’re finally ready to start painting Alice in Wonderland!
First, create a new layer above your Lineart layer, which we’re going to use as a Soft Light Layer.
To do this, select Soft Light from the Layer mode (top left of the Layers palette) then choose a medium dark gray to begin coloring with. Reduce your Opacity to Sycra’s magic number of 27 per cent and let’s get to it!
What we’re after is a nice saturated color to suit our comic illustration style, so choosing a medium dark gray will help add some nice darker shades to our painting.
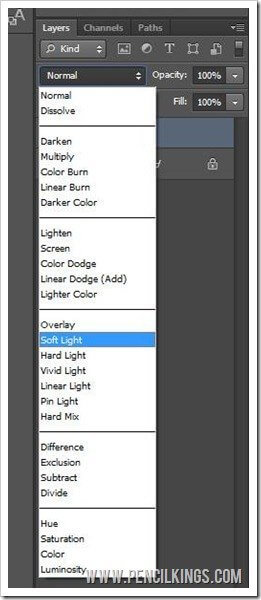
Going back to your Layers palette, make this new Soft Light layer into a Clipping Layer by holding down Alt when you click between this and the Lineart layer.
This will mean that any changes you make will only appear on the layer you’re now linked to.
Using a variety of brush sizes according to what area you’re working on, start laying in some areas of form and adjust the gray to a darker shade and up the Opacity if necessary.
Once you’ve finished working on your Soft Light layer, make another duplicate of the Lineart layer beneath so you always have the original as a go to if you make a mistake.
To see how your changes are now adding color values, click on the black and white Hue and Adjustment layer you created in the previous lesson.
You should now see that the forms in your painting are more clearly defined.
If you don’t see too much of a difference, don’t worry – painting is a long process of slowly building up subtle layers and shades so you end up with an awesome result.
In your next lesson on painting Alice in Wonderland, you’ll learn how to keep adding these subtle shades and discover everything there is to know about blending.
See you soon for more awesome artistic fun!
Return to the Stylized Painting Lessons Page