[full_width_section bg_pos=”Left Top” bg_repeat=”No-Repeat” text_color=”Dark” top_padding=”50″ background_color=”#ffffff”][vc_column width=”1/1″][vc_column_text]Looking for a Photoshop digital painting tutorial that really works?
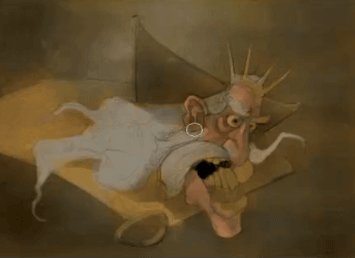
To start off this lesson, you’ll use a levels adjustment layer to really bring up the whites in the drawing, even blowing out the whites a little bit.
If you are not familiar with what ‘blowing out’ a color means, it’s when there is no tonal variation between the different pixels.
This might sound confusing but if you think of a gradient going from white to black with smooth variation between the different tones and then you started to raise the tonal value of that gradient so that it became lighter and lighter.
Eventually in the white area of the gradient, those light tones are going to get raised so much that they too will eventually become totally white, and then you could say that the area that is totally white is now blown out.
The same thing goes for when you are working with black. In this Photoshop digital painting tutorial, you’ll learn why having too much black is not a good thing.
Why? Because you will lose all the details that were in the original tones as they become the same value of the tones around them.
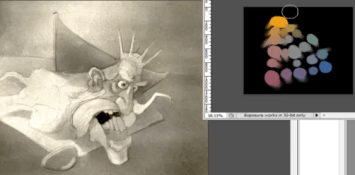
Photoshop Digital Painting Tutorial: Establishing Your Color Palette
In this Photoshop digital painting tutorial, you can see that Mark has established a palette of colors to start with for this drawing. This will give you a starting point to work from for the rest of your drawing.
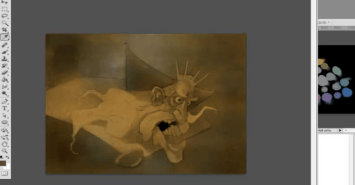
Coloring the Background
Start off by creating a new layer, setting it to multiply and then filling it in with one of the colors from your swatch. Then work with another color to introduce some more variation into the background.
At this point you are still exploring and experimenting so don’t worry too much about what you are doing because it will continue to evolve over time with the rest of the drawing.
Coloring the Skin & Hair
Again, select one of the colors from your palette and start to paint in the skin and the hair.
While you are going through this process in this photoshop digital painting tutorial, remember this:
If you are using the eyedropper tool to select different colors, it’s important to set the tool to only sample colors from the current layer.
If you don’t set it up this way, because you are using a multiply layer to begin with, you will find that your colors get darker and darker as you continue to work.

And that’s it for this Photoshop digital painting tutorial! We hope this gives you everything you need to get started with digital art and we’d love to get your feedback in the box below![/vc_column_text][/vc_column][/full_width_section]