How to Draw Faces at Different Angles: Think of the Head as a Sphere
When learning how to draw faces at different angles, you first need to rotate the head. And, in order to do this, it’s best to start thinking of it as a sphere that can rotate in 3D space.
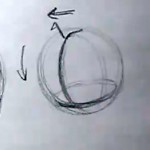
While the concept is easy enough to grasp, this might be a little difficult to draw at first.
So, if you have difficulty drawing what you see in the video here, don’t feel bad about spending a little extra time each day as you are learning.
Just practice drawing and rotating the shape of a sphere until you get it right.
It only takes a few seconds to draw a rotated sphere, so try incorporating it into your warm-ups before you start drawing and draw 10 or 20 spheres facing in all different directions.
It won’t take long for this to become second nature to you. Before you know it, you’ll know exactly how to draw faces at different angles!
Drawing in the Jaw Line and Ear
With the head tilted it’s now time to define the line that divides the front of the head from the back. Remember that the jaw line starts right about at the same place where the lower part of the ear connects with the face.
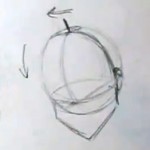
This is another area where practice is your friend, so start taking notice of faces when and wherever you can and how the jaw line looks as the head tilts to the side. Magazines are my personal favorite for finding great material to practice copying and better understand how the shapes of the face look from different angles.
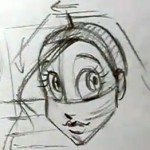
Adding the Facial Features
Start off by drawing those big patented LaurieB! style eyes. When working out how to draw faces at different angles, remember that because the face is tilted away and down, the features should appear smaller and slightly squished on the far side of the face.

One of the things that people have trouble with when drawing a three quarter view face like this is that the face looks too flat, so while it is turned keep in mind how that line down the middle of the face curves for the forehead down into the nose.
To keep the features along the lower half of the face in proportion to one another use guidelines to divide up that part of the face like you’ve learned how to do in previous lessons.
Finish off With the Hair Line
The last thing to add, just like when drawing the face from the front view, is the hair line. Because the head is tilted it’s going to come down a little further than when drawing the front or side views.
If you’re having some trouble finding the right spot for this, just erase and try again. Remember to draw lightly at all times while you are working out your drawings so it’s easier to erase and reposition the details as needed.
We’re done! Did this article help you learn how to draw faces at different angles? Leave us some feedback below.
Go to the Face Drawing Fundamentals Video Course