
Learning how to design a character is easy if you follow these 5 simple steps
This is part 1 of a 3-part series on designing characters
- Part 1 [You Are Here] – Character design tips for better concept art
- Part 2 – How to write an outline for your character
- Part 3 – Building the perfect reference library
Want to pick up some simple character design tips to help you create a limitless range of characters for your concept art?
Start right here…
As you’ll soon discover, there’s a whole lot that goes into designing a character before you’ve even started drawing anything.
And this is the part where many people go wrong, because they jump right into the drawing before doing any of the necessary prep work.
Sound familiar? We’ve all made this mistake at some point, but the solution is right here in our 5 character design tips…
When you follow these 5 steps of how to design a character, you’ll have everything you need to create characters full of life.
Why? Because you’ll have done all the necessary prep work to make them believable.
Step 1 – Discover Your Character By Writing an Outline
If you’re working on someone else’s project, you should already have a good idea of the world this new character will be part of.
However, if you’re creating something of your own from scratch, this is a very necessary step which you shouldn’t avoid. In fact, it’s probably one of the most important character design tips you’ll ever hear!
In your outline, you need to focus not only on how to design a character, but also on the universe they’re part of, or the type of world they live in.
If the story is based on real world places and events, this can be much easier than if you are creating everything from scratch.
Depending on how far you want to go with this exercise, your outline could be as short as a few sentences, or something that spans several pages.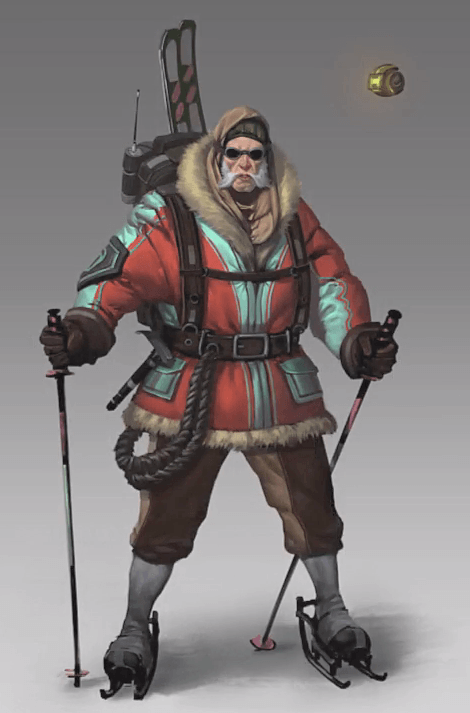 Just make sure not to take this step lightly. It’s essential – especially when you are learning how to design a character for the first time.
The goal here is to fully understand how your character fits into this world. And, the more you know this, the easier it is going to be to decide which details to add and which to leave out when you start drawing.
So how do you put together an outline?
It’s actually easier than you might think, so crack open your notebook, or open a writing program on your computer.
This blog post on how to write an outline for your characters will give you plenty of character design tips to help you get started.
The purpose of the outline is to write out all the relevant details for your character. And, when you do this, you should go deeper than just surface level details and really think about the role this character will play.
Think about what your character will be doing, and what kind of equipment and clothing would be suited to that role. Then think about how your character got to where they are now – what’s the back story?
Once you feel you really have a sense of who this person is and how they fit into the world, then you’re ready to move onto the next step of our character design tips.
Step 2 – Go Deeper With Research
With your outline in hand, it’s time to start digging in and collecting research materials.
We recently spoke with an art director at Pixar for the Pencil Kings Podcast and asked where he saw most new artists making a critical mistake when learning how to design a character.
Can you guess what he said?
His answer was that artists just aren’t doing enough research.
And, by research, we mean collecting the visual references and understanding your character on a deeper level.
This blog post on putting together the perfect reference sheet is crammed with character design tips to help you get the most from your research.
For the visual references, there are 2 types: Direct and Indirect reference.
For direct reference you could look at similar video games, films, comics etc and find examples of what your character should look like. This type of reference is great, because you are looking at what has already gone through multiple iterations to get to its final form.
The problem with direct reference, however, is this: There’s a chance your work could appear derivative at best…and a rip-off at worst!
To give you a real world example of this, you may be working within a sci-fi themed universe, and decide to use the characters from the Aliens movie as your main point of reference.
For indirect reference you are looking at photographs and real world objects that can inspire you to create new types of work. For example, if your story was set in the great depression, then it would make sense to look at photographs from that era.
In doing this, you could see what speaks to you, and what you want to bring forward with your own design.
By looking at lots of reference, not only of people but of objects and environments of the time, you can get a much better sense of the world your character needs to be placed in. You’ll also know which details would (and would not) be appropriate for them.
You may also want to look at forms in nature and use those as jumping off points for your designs. You’d be surprised at how many designs are actually based off all the strange life in the ocean we rarely get a chance to view.
Trips to the museum or art galleries are also highly encouraged here. Remember to take your camera, because I can guarantee you’re going to see some really inspiring stuff you’ll want to capture.
You might also want to check out this podcast with Donato Giancola – an artist who has visited museums all over the world for inspiration.
During the research phase, you need to be collecting all these materials so you can go back later and review them all together. You never know what may spark an idea, and it’s best to have these laid out so you can go back into them at a later time.
There is such a thing as doing ‘too much research’ and if you feel like you’re going overboard, you probably are. Don’t let the research phase get you stuck. Collect what you can and then continue to move forward.
Here you can see an example reference sheet which was put together to explore what Victorian era explorers looked like.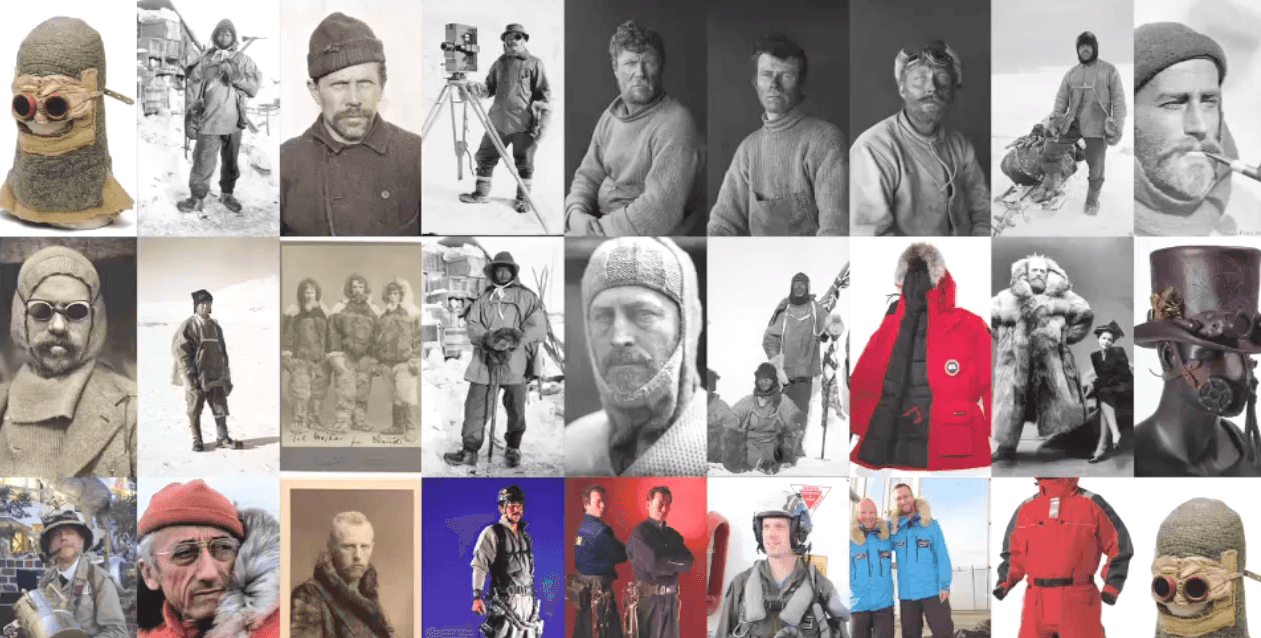
Step 3 – Start Designing Your Character Thumbnails
Once you know who your character is (Step 1) and have done the necessary research and visual exploration (Step 2), it’s time to finally start drawing your character.
To start off, you’ll just be working with thumbnail images. The reason for this is so you can work small and quickly, and create many different ideas before choosing one final thumbnail to move forward with.
You can create your thumbnails as silhouettes like in the example below, which really frees your mind up from worrying about all the little details.
You’ll have time to get to those details, but right now you’re just trying to get out as many possibilities as you can quickly by drawing on what you learned during the previous two steps.
While you are at this stage and working digitally, don’t be shy about using the warp, transform and liquify tools. Use whatever you need to work fast.
How to Design a Character: Creating Poses
Remember, your goal at this stage of our character design tips is to come up with an interesting pose and silhouette. You’ll also need to keep in mind who your character is going to be, and how they will fit into the universe they are being designed for.
Once you have your silhouettes created, the next step is to cut back into the designs by either erasing or using white to add in some broad details so you get a better sense of the character.
At this point, you may start to worry whether you have the skill or not to create a convincing character. Don’t sweat it! It’s important to remember that, right now, you are the designer.
You are trying to come up with something unique, cool, interesting, and intriguing. And, to do this, you can draw from the references and the outline.
The image below shows thumbnail silhouettes created for the Scientific Explorer Character Design Course.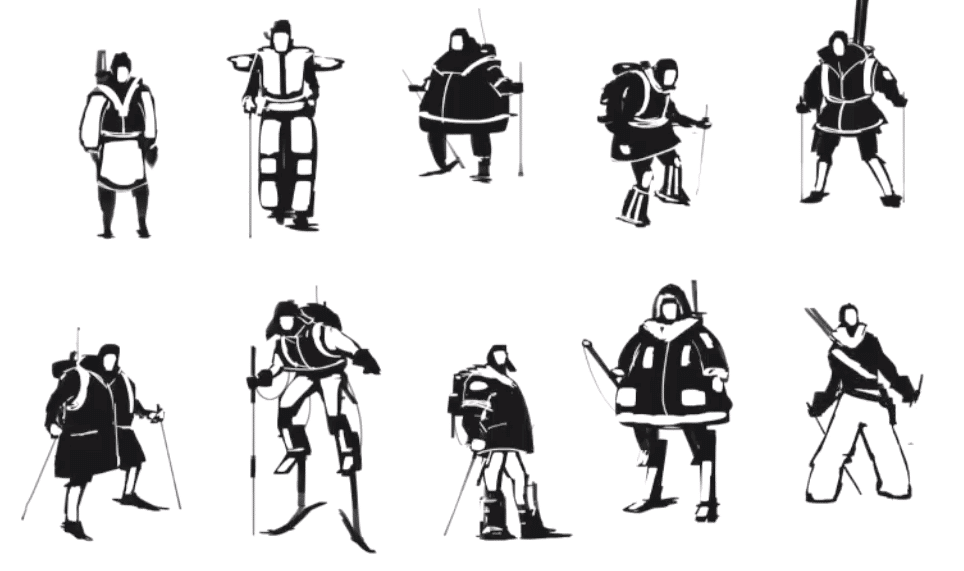
Step 4 – Blocking in & Detailing Your Character
Once you have your thumbnails drawn out, it’s time to select one of them to move forward. And, by going through the first 4 phases of character design, you’ll be able to choose the best of several designs.
Through making these designs, you’ll already have incorporated so much information from your research and outline that you’ll be more than ready to move forward.
And if you still don’t feel you have a thumbnail that is jumping out at this point, it’s completely OK to go in and do even more thumbnails until you get something you’re excited about!
With your thumbnail in hand, it’s time to start blocking out. This is where you will go in and add all the little details that really make up your character.
Once you are done with this stage, you should be at a point where you could call it quits and have your character design in hand, or hand it off to someone to take it to the next stage.
If there’s a ‘hardest’ part of our character design tips, this might be it.
If you find your skills aren’t quite at the level you want them to be, we have a whole library of art courses you can use to make the improvements you need. If you’re interested you can find out more about our courses here.
You can see an example above of the explorer scientist we’ve been using for this article with lots of additional details added in. There isn’t any color on this image, but there is enough detail for you to know where all the major parts of the character design should go, and you can really get a sense of their character.
Step 5 – Rendering
This is the last one of our character design tips.
And the best part?
To be completely honest, it is often not needed for many character designs.
Why? Because there is a misconception that character design and concept art are all about creating highly polished works of art.
But here’s the reality. In a real production, you may be tasked with coming up with several character designs every day.
And, because of this, you simply won’t have time to take the work to a completely rendered and ‘finished’ look.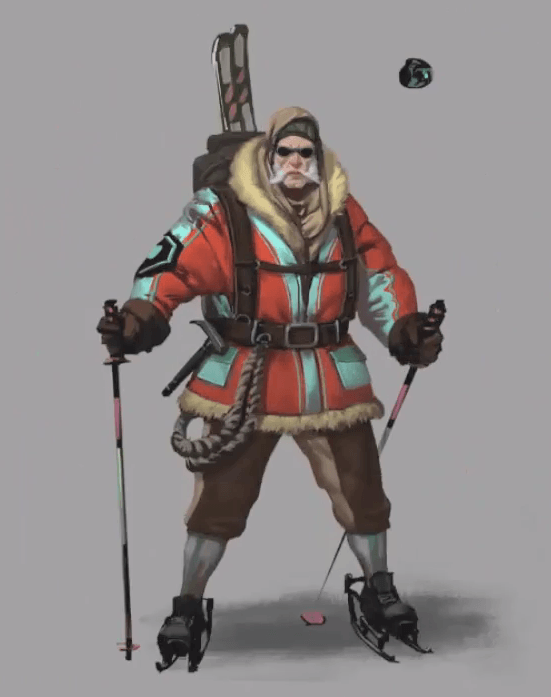
However, there is a level of rendering that you need to get to. It’s so you can get an idea of the different materials, the overall colors of the character, and any special effects that need extra attention.
It’s really up to you how far you want to take your rendering. And if this is a central character for your story, it may be totally worth the extra time.
Likewise, if this character is going to be handed off to an external team (where you can’t explain some of the design decisions you made), you’ll need to make sure all that information is communicated with the image.
That was very inspiring, as Its something I need to do for my role playing game, though I have quite a lot of characters I need to create. So that will be a challenge. I will be taking this course.
thank you for sharing this tips!! I love them all. i’m an aspiring artist. i also dream to be a concept artist in big companies that make games. thank you for sharing this
Hi Ron and thanks so much for getting in touch. I’m glad you found these tips useful and I hope you continue to enjoy your art journey. Why not some and say hi in our community and share your work?