Set Up Your Selection Masks
Ready to learn how to paint a pin up girl in Photoshop?
To get started with coloring a digital work – the first thing that you will need is either a scan or a photograph of a drawing that you’ve done.
A scan is best so that the white of the page will be pure white which will make it easier to work with and create this first step. We’re going to get a little bit technical here, but don’t worry – this is really easy stuff, and you’ll be diving into the fun coloring part in about 5 minutes.
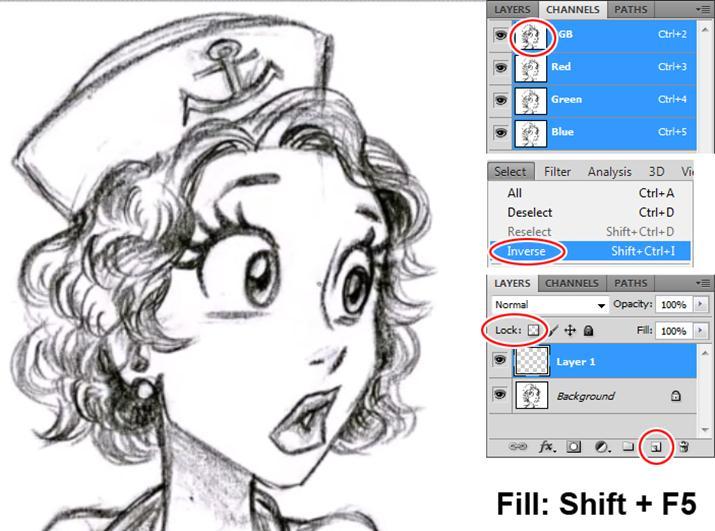
Go into your Channels, and CTRL + Click on the RGB Channel – this will select all of the color information, but none of the black. To explain in a little more detail, all color on the computer is made up of Red, Green and Blue, and each of these components can have a value of one to two hundred and fifty-five.
An easy way to think about this is if all colors are value of zero, there is no color information at all and you will naturally get black. If there is a red value of 255, a blue value of zero, and green value of zero which color do you think you will get? If you said “Red” then you would be right! Same goes for Blue 255, red 0 and green 0 – you will get blue.
So when you use CTRL + Left Click on the RGB channel it’s selecting all of the color information for all your Red, Green and Blue (also referred to as RGB) in one click.
But there’s a problem! What this is actually selecting is all of the colored information, and what we want is the black line work, so you will then need to go to Select > Inverse, or use the shortcut key of Shift + CTRL + I. This will make our selection change from the white to the black. If you’re not completely understanding, just follow along, and it will be made clear in a moment.
The next thing to do is create a new layer. You can go to Layer > New > New Layer, Click on the new layer button on the layers menu (shown on the image above) or use shortcut key Shift + CTRL + N.
Now that you have a new layer, you will need to fill it with black. You can use the fill tool to do this. It is accessed through Edit > Fill, or use the shortcut key Shift + F5. Fill your selection with Black (RGB of 0, 0, 0).
Whew – my brain hurts now after explaining all of that, but the good thing is that you should now have a new layer that has all of your line work on it, without the white background. If you didn’t get the results you were hoping for – please go back and make sure that you follow the steps above exactly.
The last thing to do when learning how to paint a pin up girl in Photoshop is to lock the transparency of the new layer that you just created.
This way, you won’t be able to paint on any areas except those defined by the line work. You can see the button for this shown on the above image.
Why is this so Important?!
One of the coolest things about this tutorial is how the line work gets colored throughout the lesson.
By setting up your lines on a separate layer and then locking that layer you’ll be able to work with them really easily.
All of this will be revealed throughout this lesson on how to paint a pin up girl in Photoshop. And, as you watch, you’ll really understand why this is so important.
Set Up the Background Color
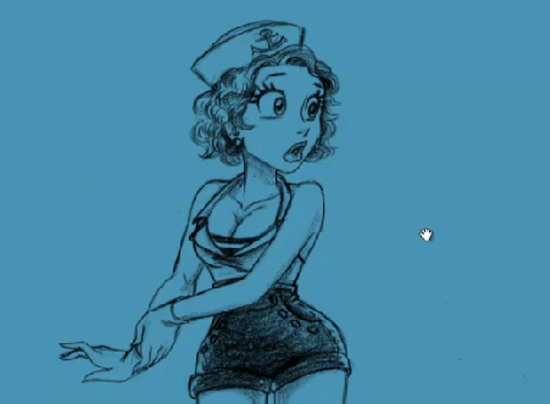
Create a new layer and then because you will be creating a nice sailor themed scene behind this girl in the later steps blue will be a good color to start with, so that you can see how your skin tones and clothing colors will interact with the background without spending any time on it.
Create Your Mask Areas
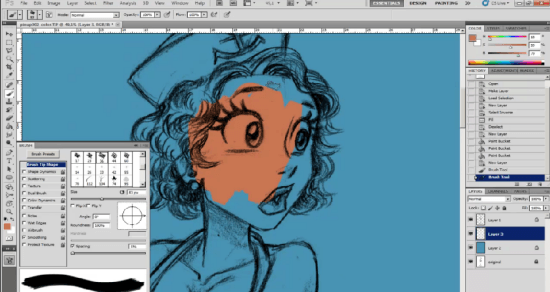
Just like you did with locking the transparent pixels for the line work in the first step, what you’re going to do now is just quickly fill in all the areas of the drawing and then once that layer has been locked you will no longer be able to paint outside of the lines.
This is a great way to set up any digital painting and I would recommend that you follow these exact steps, no matter what you are coloring.
Taking a few minutes to set this up in the beginning will save you a lot of time later on. There are a few different ways to do this:
- Select a color that will be used most in your drawing and paint in the entire painting area. If you like you can also at this stage use separate layers for the different colors you’ll be using eg: one layer for skin, one for clothing and so on, but by keeping everything on one layer allows you to work more quickly.
- Use the Lasso tool to select an area and then fill it with color
- Use the Pen tool to select your areas and then fill with color (this one is my personal favorite, but takes a little time to get used to working with it)

Check Your Work for Errors
After you have finished filling in the areas that you want to paint with color, take a few minutes to go over the edges of your work and make sure that you included all of the areas that need to be painted.
It’s easy to miss a little area here and there, so just take a moment to clean it up and then move onto the next step in this tutorial on how to paint a pin up girl in Photoshop.