Why Learn How to Shade the Face
We see dozens of faces every day. At the store, on the road, on our computers… and hey, we take them for granted every time. If you haven’t read our post about the planes of the face, then you need to stop right here until you do. Go visit How to Draw the Planes of the Head and Face and when you are done, we can meet back here.
In this article, you’ll learn:
- About the planes of the face
- Shading using planes

The face isn’t always as hard as you may expect. Because although it is a complicated 3D object, every skull follows a particular pattern and once you know one, you know them all. It’s pretty sneaky, but fun and exciting too. So, when it comes to lighting the face there are patterns that you can apply to any face you draw – and you’ll get it right every time.
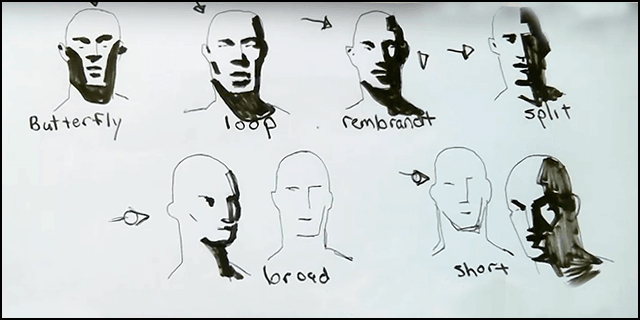
We will be going through a number of examples proposed in our video by Francis Vallejo. These include the butterfly, loop, Rembrandt, split, broad, and short. These lighting conditions are known as lighting set ups. These can be memorized and used routinely in your work.
The Butterfly

This is characterized by the shadow in which this lighting condition casts, below the subject’s nose it casts a butterfly shaped shadow which is how this setup received its name. You can recognize this lighting setup because it is cast from above and in front of the subject. Any naturally downturned planes will be kept in shadow while the upturned planes will capture the light.
Our downturned planes include the brow and upper eye socket, the nose, below the cheekbones, the upper lip, and under the chin. Butterfly lighting is most flattering on slender subjects with high cheek bones.
The Loop

Loop lighting is a light source that comes from above, but is off center, either to the right or to the left. It gets its name from the shadow the nose creates on the face. There is a looped shadow from below the eye and it connects to the shadow cast by the nose.
In this particular instance, the shadow from the nose will not meet with the shadow of the cheek. The shadow cast by the eye, will, on the other hand, touch the shadow caused by the cheek. Whichever side the light is on, it will cast shadows onto the other. (From the left the shadows are cast to the right, while right handed lights will cast shadows onto the left of the face.
In this example, the light is coming from the left, so many of the shadows are being pushed to the right side of the brow, nose, mouth, the cheek opposite the lighting and under the chin.
The Rembrandt

Rembrandt lighting is similar to loop lighting but it is pushing the position of the light even further to the side, still somewhat above but, more from the side. It is characterized by the triangular shape below the subject’s eye. This time the shadow of the nose will extend to touch the shadow cast by the cheek.
It is named Rembrandt because of the style of lighting Rembrandt often used in his work. It creates unique shapes in the shadows and patterns of light. Vallejo prefers this type of lighting in his own work as well. This style of lighting usually causes nearly half of the face to be in the light, while the other side of the face is mostly just one large shadow.
The Split

This time the lighting is being pushed even lower, pointing almost directly from the side or the other. This causes almost no light to catch onto the opposite side of the face giving the face very strong and stark shadow shapes. The face is basically split (oh, there is our word!) in half.
The Broad and Short

Broad lighting is being shown from just off axis, and the camera has been turned towards the lit half of the face. The direction of light in the Short setup is actually in the same place as the Broad set up but our angle of view is what changes. We are instead seeing more of the shadow side instead of the lit side.
Because of this, it is best to explore these two lighting situations from the 3/4th view of the face. One from the left 3/4th and the other of the right 3/4ths of the face.
In Broad lighting, you are seeing the majority of the lit side of the face, with only a little shadow visible on the shadow side of the face. On the other hand, Short lighting is when you see the majority of the shadow side, instead of the lit half. So, you see very little lit and an abundance of shadow.
Being able to remember these simple rules will allow you to create unique work especially now that you’ve got all this know-how in your head. You’ll be able to recall from memory, instead of needing to rely solely on reference to create your work. These shapes are universal and your only limit is your imagination.
TIP: It’s important to know that using reference will always make your work better and stronger. You can shoot your own photos or find them from elsewhere, but you are never confined to what you see in a reference. Learning and knowing these things will also make your work stronger. So trust what you see in real life, but trust your artistic eye, as well as your gut, to make the right choices.
ASSIGNMENT
Find a variety of reference photos that use all different lighting set ups, and study the form and placement of the shadows being cast. You do not have to capture a likeness, or actually draw a pretty face. Just practice with the shadow shapes. If you do this correctly, you should easily be able to do one hundred of these studies and that should be just the tip of the iceberg for you. You should do hundreds more.