Why Learning How to Draw a Nose is so Important
Learning how to draw a nose is one of the most important aspects of creating a portrait or a character design. And, if you follow and practice these simple steps, you’ll soon be drawing noses with complete confidence.
In this article, you’ll learn:
- How to draw a nose from the front
- How to draw a nose from the side
- How to draw the nose in three-quarter view
And our tutor, Sycra Yasin, will also be showing you how to draw a nose from the bottom view looking up.
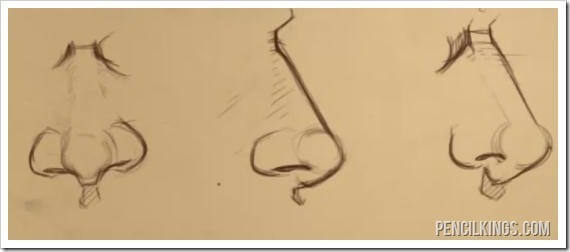
How to Understand the Construction of the Nose
Learning to see the nose as a 3D object will help you draw it more easily
Doing these exercises will help you understand the construction of the nose and encourage you to start seeing the nose as a 3D object.
And, once you’ve practiced these simple techniques, you should be able to draw the nose from any angle more easily!
Drawing the Basic Angle of the Nose

Think of the nose as a series of flat planes
To keep things simple, try and think of the nose as a series of flat planes which look different when viewed from different angles.
In fact, no matter what you’re drawing, it’s always a good idea to break the object down into simple shapes, and then add more detail to these simplified forms as you progress. This is a particularly useful technique to learn if you’re just starting out as an artist.
In this image, you can see the bridge of the nose and the septum. The bridge of the nose is the part which sticks out from your face. The septum is the piece of skin at the bottom of your nose which attaches it to the rest of your face.
At this stage, it’s probably a good idea to look into a mirror and take a good look at the bridge of your nose and your septum.
Do you see how these parts of your nose can be broken down into simple shapes? Good 
As you’re no doubt starting to find out, learning how to draw nose really isn’t all that scary after all!
Drawing the Ball of the Nose

Create the ball of the nose by drawing a circle
The next part of learning how to draw a nose is to add is the ball of the nose. You can draw this as a simple circle, but it’s important to remember this: Even though you’re drawing a 2D circle shape, what you’re actually representing is a 3D shape with depth and form.
Drawing the Nostrils and Flares

Remember to leave a space between the nostril and the flares
After you’ve drawn the ball of the nose, it’s time to move on to adding the nostrils and the flares of the nostrils.
Now, here’s where learning how to draw a nose can get a little more challenging. Firstly, you’ll need to make sure you leave a space between the nostril and the flare of the nostril like in the illustration above.
Secondly, you’ll need to ensure the nostrils extend towards the ball of the nose in the middle. You’ll also need to leave some space between the nostrils and the septum.
By now, you should have developed a better understanding of how the nose is constructed, and how it’s attached to the face.
When you’re learning how to draw a nose, you’ll also need to take the roundness of the mouth into account. This is because the mouth sits on the curved surface of your skull underneath, and the shape of this will naturally affect the shape of the nose that’s attached to it.
And, talking of attaching the nose to the face, that’s exactly what you’re about to learn how to do!
Attaching the Nose to the Face

The brow bone joins the nose to the face
So how do you attach the nose to the face? Well, at the top of the nose, the underlying structure changes from cartilage to bone.
You can try this out for yourself – just feel your nose with your fingers and and lightly move your nose around.
Can you feel the difference between the soft, bendy cartilage along the bridge of the nose and the hard bone at the top?
This hard piece of bone is your brow bone. It runs from the skull at the top of your nose, and extends vertically before extending outwards to form the brow bone above your nose.
Understanding the Surface Direction of the Nose

Surface direction lines are useful for shading
In this image, you can see the direction of the surface lines on the nose. As these surface lines move from the side of the nose into the cheek, they get smoother.
Because of this, it’s not necessary to draw any hard lines separating the nose from the cheek.
Understanding the surface direction of the sides of the nose comes in really handy for when you want to begin adding more detail to your drawing with lighting and shadow.
Defining the Eye Sockets and the Bridge of the Nose

Defining the edges of the eye sockets helps your nose drawing look more realistic
You’re now ready to start adding some lines to define the eye sockets and the bridge of the nose. Sketch these in lightly, just like in the illustration above. Do you notice how drawing these lines helps to define the shape of the nose and how it sits upon the face?
Use light, diagonal strokes to indicate the line along the bridge of the nose. This will give it a nice, soft effect.
Remembering the Main Parts of the Nose
For the last part of this lesson on how to draw a nose, let’s go back and take a second to memorize the basic parts of the nose. Understanding these key elements will help you draw any type of nose more easily, and you’ll be able to see the differences between various noses more clearly.
The Main Parts of the Nose are:
- The Bridge
- The Septum
- The Ball
- The Nostrils
In our next lesson on how to draw a nose, you’re going to learn more about drawing different types of noses in different styles. And, because you now understand the basic construction of the nose thanks to this lesson, we hope you’ll soon be able to draw endless varieties of noses!
Thanks for making this but please make it less complicated!
Hi McKenzie and thanks for getting in touch! If you’d like a great intro to drawing a nose (and the rest of the face), you might find our video course from Francis Vallejo ticks all the boxes: https://www.pencilkings.com/course/drawing-faces-francis-vallejo/ See how you get on and feel free to ask any questions if you need any more help 🙂
This was helpful I’m a student at The University of pan-american at Texas, and I am getting a bachelors in communications with a minor in art. I always had a hard time drawing the nose and this kind of sum it up.
Hi Pedro and thanks so much for your feedback. I’m really glad to hear this video course helped you out and wish you all the best with your studies. Have you checked out our community site or our #Team PK Facebook group yet? They’re great places to share your work, ask questions, or just meet fellow artists 🙂
Hey thank you awesome tutorial. I shared it with some friends!
Hey Vicki and thanks for getting in touch! So glad to hear you and your friends enjoyed this tutorial – stay tuned for plenty more 🙂
Loved it so awsome extremely helpful
Hey Emily, thanks so much for your feedback – we really appreciate it! So glad you enjoyed this course – stay tuned for plenty more art goodness 🙂
Thanks for posting this. I’m working on getting better at drawing noses and this is a helpful tutorial. Can you please tell me when the next part (drawing different styles of nose) will be posted? Thanks 🙂
Hi Arlene and thanks so much for your feedback 🙂 If you found this tutorial helpful, you’ll want to check out the whole video course from which this particular blog post is taken: https://www.pencilkings.com/course/how-to-draw-a-nose/ Hope you enjoy it 🙂
I am not an artist, but have to draw some cartoonish noses as placeholders for an app I am developing. My efforts so far have been pathetic. This tutorial has given a good idea on how to make it all more convincing (at least until a proper artist replaces my efforts)
Hey Jon, thanks so much for getting in touch. I’m really glad this tutorial has helped you draw better noses, but stop putting yourself down so much! Every artist’s first efforts could be described as ‘pathetic’ – it’s only through observation & practice that people get better! Therefore, just keep drawing in your spare time and have fun. Don’t worry about making mistakes or what the end result will look like. Before you know it, you’ll start to see real improvements as everything falls into place. Good luck 🙂
Thanks so much I needed to know how to draw noses cause I can’t but thanks to this I can now thanks for making it super easy now I know how to draw noses good?
Hi Madelynne and thanks for your feedback! I’m really happy this course helped you learn how to draw noses 🙂 Why not share some of your work in the Pencil Kings community? It’s a great place to meet other artists and swap ideas – see you there!
This was super helpful. I’ve tried to draw since I was a kid and love to draw but have never been able to get the eyes or nose looking even CLOSE to realistic. I just did all four versions of your examples and have practised for an hour and already added an amazing nose to a drawing that’s been unfinished for 6 years!! Thanks so much for this lesson, I’m off to hunt down your “eyes for beginners” page!
Hi Maygan and thanks so much for your feedback – we really appreciate it 🙂 I’m over the moon to hear how reading this article has helped you draw realistic noses. I hope you enjoy the tutorial on drawing eyes, too 🙂
i needed to draw a nose for my multi media class. this was not helful at all. extrememly dissapointed!!!! 🙁
Hi Angel, we’re really sorry to hear you didn’t find this helpful. Which part of drawing the nose do you need help with? We’re always happy to help 🙂
yes! Finally, i’ve mastered it. i can now draw a nose perfectly. Thanks alot…. this is really helpful
Thanks so much for your feedback! I’m thrilled to hear this course helped you draw noses – here’s to your future success as an artist 🙂