Drawing face proportions is one of the most important things you can learn as an artist. Not only will doing this give you a great base to start from when drawing portraits, it will give you the confidence to draw faces from your imagination and so much more.
We know there are lots of resources already out there to do this – in fact, we checked lots of them out while researching this article. Some of them were pretty good, others not so great. However, we know from your comments that lots of you are still looking for the ultimate guide – one you can get excited about from the get-go and one that artists of all abilities can relate to.
That’s exactly what we’ve tried to do here. We don’t want you to have to search high and low anymore. We don’t want you to be put off by complex anatomical terminology. We want to break the mystique of drawing face proportions and the human body once and for all. As artists ourselves, we wanted to create the best kind of guide – an easy to follow, super useful one you can refer to time and time again. Are you ready? Let’s get it started!
Here’s what you’ll need:
- Pencil and paper or a graphics tablet
- A mirror placed nearby so you can study your face
1. Drawing Face Proportions: Start With Circles
Like we said, there are lots of different methods for drawing face proportions, but we think the Andrew Loomis approach is one of the best. Why? Because it breaks things down into basic shapes and gives you a pretty much failsafe blueprint to work from – again and again.
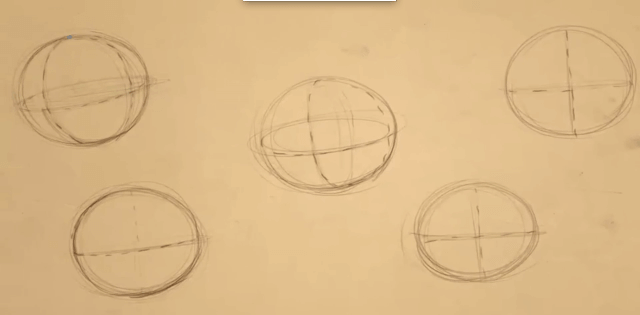
So, what’s the first thing you need to do? Start by drawing simple circles – nothing more complicated than that. You’ll need to draw five circles here, because we’re going to be drawing the head from five different angles. Don’t worry – it really isn’t as scary as it sounds!
2. Turn Those Circles Into Spheres
Once you’ve drawn your five circles, it’s time to take them from 2D planes or objects into 3D ones. How are you going to do this? Just imagine an orange or an apple like in the pic above. Now, imagine the fruit cut into eight equal segments – first horizontally across the middle, then vertically, and the finally down the sides (we’ve drawn some lines on the second pic to help you out).
To see this in action, let’s hand you over to our instructor, Sycra Yasin, who goes through this in greater detail in his Face Drawing Proportions tutorial for Pencil Kings:
[vid url=https://vimeo.com/220912311]
Getting the hang of it? Don’t sweat it if this takes a while to get right – just keep practicing until you can do it without thinking too much. You can even grab a real orange or any other round object and draw lines on it if this helps you! Remember to look in your mirror to see how your own face relates to these guidelines – it should all make sense real soon.
Making the leap from 2D to 3D planes can take a little getting used to at first, but we know you’ll get there soon.
And, when you do, you’ll be amazed at how much easier this makes drawing everything else.
Why do you need to know this? It’s because learning to see things this way will help you to draw things that actually look 3D. Have you ever found your drawings end up looking too flat? This is probably why.
3. Flattening The Sides Of Your Sphere
We think Andrew Loomis had a great way of describing the shape of the human head. In his view, the cranium was more like a flattened ball than anything else. How come?
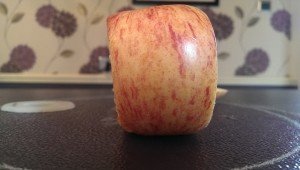
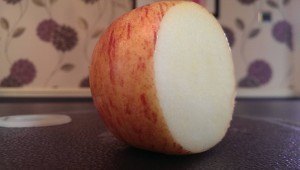
Well, imagine if the sides of your spheres were shaved off slightly. Depending on your subject’s head shape, this would give you a pretty accurate sketch of the basic shape you need to work from.
Because you’re looking at drawing the head from several different angles, you’ll need to approach each of your spheres differently. At this stage, we think it’d be super useful for you to take an apple and cut the sides off – just like in the pics above. This should give you a pretty good idea of what we mean. And, as an added bonus, you get to eat the apple afterwards like we just did!
When drawing this, you’ll need to replicate the effect of the sphere (or apple) with its sides cut off. Sycra does this by drawing another, smaller circle within some of his spheres (he doesn’t need to do this for the front and rear views). Once he’s drawn this other circle, he marks where the edges of this meet the segment dividing lines you drew earlier.
[vid url=https://vimeo.com/220912663]
Because this part of the head is a flat plane, he draws straight lines horizontally and vertically through the middle of the smaller circle to represent this. Try it yourself – you should now see that you have a sphere with a clearly defined flat area.
To see this in action, take a look at the video clip below and think about the apple we drew – and ate – earlier!
4. Basic Facial Proportions For Drawing
Once you feel comfortable with the basic head shape, you’re going to want to find a good way of mastering basic facial proportions for drawing.
Once again, we look to Andrew Loomis for the answer. Of course, we know there are lots of other awesome artists who’ve done this too, but we just think his approach is one of the most straightforward there is. And, when you’re starting out – or simply brushing up on your artistic skills – we think straightforward is the best way to go!
To start off, let’s take a moment to go back over the lines you’ve drawn on your spheres and see what they represent. When looking at the front view of your sphere, it’s like this:
- The horizontal line through the middle is the brow line.
- The vertical line through the middle is the middle of your face, where the nose will sit. This line is also useful if you’re drawing someone’s head from the rear.
- The side-to-side lines (the other dividing lines) are useful when placing the ears.
- The flat planes at either side of the sphere will help you place the temple.
5. Finding The Right Place For The Hairline
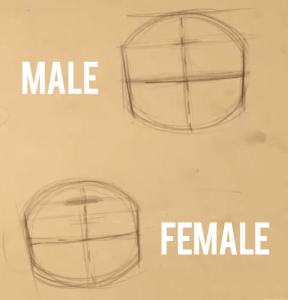 The next stage in learning about drawing face proportions is to find the right place for the hairline. And guess what? It’s slightly different for males and females, so we’re going to show you how to do both!
- The Male Hairline is located just above halfway between the brow line and the top of the head.
- The Female Hairline is located slightly higher than this – roughly one third down from the top of the head.
Remember, this is just a general guide and some people may have higher hairlines than others. However, we think this should give you a good basis to work from which you can adjust to suit.
Practice drawing hairlines for males and females until you feel comfortable with it.
If it helps, take a look at our instructor, Sycra Yasin, to see how he does it.
[vid url=https://vimeo.com/220912714]
In the next blog, we’ll take a look at drawing face proportions in greater detail. You’ll learn all about nose and chin proportions, drawing the jaw line and the back of the skull.
This guide is for you, so we’d love to hear how you’re getting on so far. Leave us a comment in the box below and we’ll get straight back to you!