Why Learn How to Draw the Planes of the Head and Face
Have you ever looked at a face and marveled at its structures, but you may never have really taken on the task of understanding them as they sit as 3D objects? In fact, you have probably taken much of the face for granted, so when looking to draw it, you don’t think of it as a 3D object, but as a flat surface. To get past this, learning the planes of the face will help you to start thinking of the head and face as a 3D structure.
In this article, you’ll learn:
- The planes of the face
- How to draw the planes of the face
- To understand the face as a 3D object
The Planes of the Face

In this post, we will be exploring How to Draw the Planes of the Face. Whatever it is you want to do, if it has anything to do with drawing people, knowing and understanding the face is the most important place to start. Understanding the planes of the face allows you to quickly construct the face, draw in the features, and shade the face in a matter of minutes. All you have to do is read this post, and all our other posts on drawing the face and you’ll be a pro in no time.
Simple Head

Whenever doing a study of the face it’s important to know the basics. So, if you haven’t learned about How to Draw the Skull, How to Draw Proportions of the Face, or How to Draw the Face, now is a great time to head over to our other posts before launching into this one.
With that said, you can see how we quickly drew the basic shape of the head, the round part of the skull (the cranium) and the jaw (the mandible). We also drew in the indication as to where the brow, eyes, nose, and mouth will be placed. We were able to accomplish this in a matter of second. If you do your diligence you’ll be able to accomplish that too.
TIP: To improve your speed, when learning How to Draw the Planes of the Face, you want to do quick fire sketches, at least 25 heads at a time. You want spend as little time as possible to place all the elements onto your face and once you are done, you reflect on what is right and what is wrong, before moving onto doing the next one. While doing the next sketch you try to improve on your mistakes, but you still focus on speed.
The Nose

To start this off let’s take a look at the schnoz, that weird thing sticking out of your face. As you can see, there are four major planes of the nose to look at. The front, which comes out on a forward angle, the sides of the nose that attach the nose to the cheek and the bottom. The bottom is where the nostrils are. You’ll notice some nostrils later, Francis Vallejo added them in somewhere in the next step. (Oops)
When looking at the nose, lighting can change the shadows dramatically. How much shadow is cast, if it is cast to the right or the left, all of this is altered by even just a slight change in light direction. The one constant is that the bottom of the nose is almost always in shadow, unless being lit from beneath.
The Lips

If you are like me, the lips are the second-best feature on the human face. If you haven’t read before, check out our post on How to Draw Lips. The one thing to make note of here is that the upper lip is a downward facing plane. In contrast to this, the bottom lip is actually an upward facing plane. Knowing this becomes more important when you are shading the face, which you can learn about in our How to Shade the Face post.
The Eyes

The eyes themselves are just round eyeballs, with skin overlapping them. If you haven’t learned about How to Draw the Eyeball, or How to Draw the Eyes, you’ll want to get in on that! Something that stays pretty consistent is the fact that the brow bone extends past the eyes, causing a shadow to appear on this downward facing plane.
However, the eyeballs themselves do protrude meaning that the upper lid becomes an upward facing plane and can catch the light quite easily. The lower lids are a more downward facing plane creating a darker area below the eye.
But the lighting can easily change, and the way this area is lit can change dramatically. It’s important that you find a lighting reference that depicts the lighting situation you are creating in your work, to accurately depict the lighting.
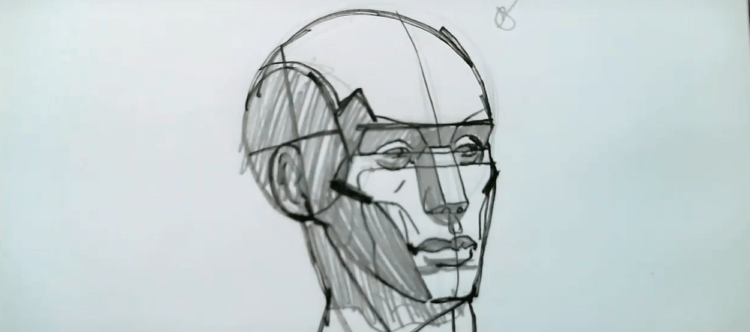
The Side of the Head and Ear

When you are learning How to Draw the Planes of the Face, it’s important to understand the shape of the skull. The major shape is the shape of a sphere, but this isn’t entirely accurate. The sides of the skull are basically flat. This has been indicated in the drawing above with a circular shape on the side of the head. The flatness is established by cutting this area vertically and horizontally with straight lines.
The ear itself is a very complicated shape, so if you want to really know more about the ear you’ll have to read our post about How to Draw the Ear, but as you can see the placement is along the centerline of the side of the skull at the halfway point. It has been indicated as a simple C-Shape.
The Cheekbones and Jaw

The last step is indicating the cheekbones, the cheek, and the jaw. These shapes are all closely related. The cheekbone has been indicated in this image with particularly stark line work, below the eyes and off to the sides. This indicates the exact location of the cheekbone. The cheek itself connects the area of the cheekbone to the jaw itself.
This area of the cheek is most commonly a sort of downward facing plane, especially if the person has particularly jutting cheekbones, and a smaller jaw. In other cases, it can be a flat plane that is basically facing to the right and left of the cheekbone and jaw are relatively the same width. In other cases, the jaw can be wider than the cheekbone and cause a somewhat upward facing plane.
These five areas are the major planes of the face. These shapes could easily be made much more complicated, but it doesn’t have to be. Keeping it simple is the best advice that anyone could be given.
ASSIGNMENT
In order to memorize these forms, you will create 50 renditions of these facial planes. You will want to take as little time as possible, maybe a minute on each one. Exact accuracy isn’t needed, just the basic forms so you can commit these to memory.