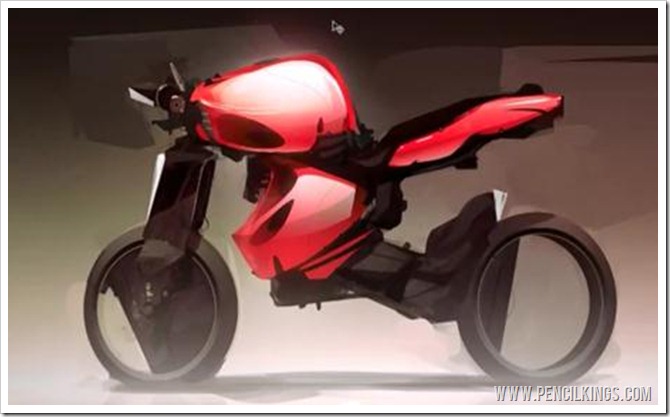
Here’s a quick look at the finished painting in this series on how to draw a realistic motorcycle
Ready to learn more about how to draw a realistic motorcycle?
Now the wheels are done, it’s time to start rendering the body of your motorcycle using a range of brush and masking techniques.
The skills you’ll pick up in this lesson don’t only apply to motorcycles, though. You’ll be able to use them when painting any subject!
So, put the key in the ignition and let’s get going!
Here are a few important points to remember from this lesson on how to draw a realistic motorcycle:
Always Label Your Layers to Avoid Confusion
When working in layers, it’s easy to get confused if they’re not labeled correctly. To do this, simply Double-Click on each group or layer and give it a recognizable name, such as ‘front wheel’ or ‘back wheel’.
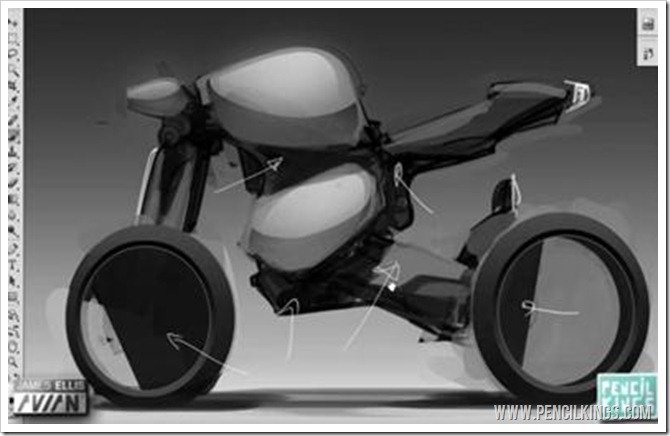
Using the Lasso Tool to Create Rendered Shapes
Because we’re dealing with hard surfaces such as metal and fiberglass here, the best way to create rendered shapes is to use your Lasso Tool.

To do this, create a new layer for each shape and then, using the Lasso Tool, draw a series of shapes which follow the contours of your drawing. These can then be filled in with your brush in a variety of light and dark shades.
Holding down the mouse while you do this will enable to draw any shape you want and then, you can hold down the Alt key while using your Lasso Tool to subtract areas from the shape you’ve just drawn.
When doing this, try to think about the forms of your motorcycle and where the light source is coming from.
Create a new layer for each new shape and build up your painting using as many masks as you like. Remember that not all parts of the bike will be shiny, so just work on the areas such as the tank and body for now -we’ll add the matt areas later.
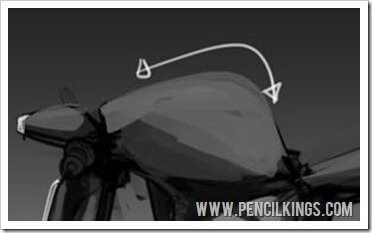
How to Draw a Realistic Motorcycle: Treating the Tank
The tank is one of the most prominent parts of the motorcycle, so be sure to create a large curved shape in this area when learning how to draw a realistic motorcycle.
Think about where the light would hit it and keep drawing those shapes quickly to build up form and create a realistic 3D effect.
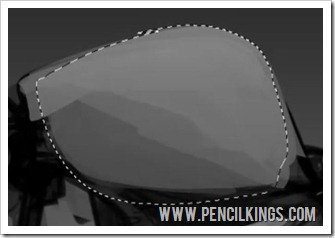
Once you’ve defined the form of the tank, you can use a simple trick to really make this stand out. First, using your Lasso Tool, draw the general shape of the tank and apply a white to transparent gradient to the selection.
Then, holding down the Alt key, take the top area away so you’re just left with the bottom curve. Apply a darker gradient to this new area and you’ll soon end up with a 3D form that looks awesome.
Again, try and think about the form of the tank and how it turns into or out of the light.
To create the shiny surface of your tank, draw another shape which follows the shape of the tank but doesn’t go right to the edge. Then, fill this area in using a lighter shade of gray.
To create a highlight, draw another, smaller shape on top, fill it with white and then go to Filter > Blur > Gaussian Blur to blend this in a little.
There are no precise percentages here – just find the level of blur that works best for you.
If necessary, adjust the opacity of your layers as you work so they all sit nicely on top of one another.
Repeat this process for the other areas of your motorcycle and, again, think about how the light affects each part.
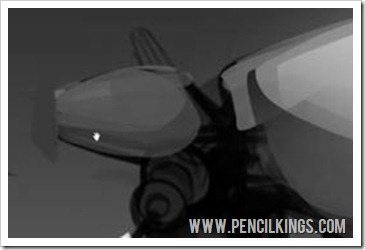
Defining the Details of Your Motorcycle
Zoom in on the smaller areas of your motorcycle and use the same techniques to add form.
The light at the front would be highlighted in certain areas and shaded in others, but, rather than curving down, it has a flat edge at the end.
To create this, draw a shape with the Lasso Tool and then subtract from this to make a flat edge.
Again, add an area of highlight by filling your selection with white before applying a Gaussian Blur.
Eventually, you should start to see your painting come to life, with shiny, 3D areas that leap out of the canvas at you!
Don’t forget to save your work before you move on to the next lesson, where you’ll be working on the matt areas of your motorcycle using similar techniques to build up forms.
We hope you’ve learned a lot from this lesson on how to draw a realistic motorcycle and we’d love to hear your comments. Don’t be shy – tell us your thoughts in the box below!
Return to the Motorcycle Concept Sketching Lessons Page